Quick Setup Scanner: Difference between revisions
No edit summary |
No edit summary |
||
| (6 intermediate revisions by the same user not shown) | |||
| Line 1: | Line 1: | ||
This tutorial | {{DISPLAYTITLE:Linking and Scanning with NP Tracker Scanner Applications}} | ||
== Scanning | |||
This tutorial provides a step-by-step guide on how to link and scan using our scanner applications. For demonstration purposes, we will focus on the NPS-ACCESS application. | |||
=== | |||
[[File:NPS-CLOUD_Dashboard.png | If you need assistance with scanning or want to check the list of tested devices, please refer to [[Compatible_Phones|this post]]. | ||
[[File:NPS-ACCESS TokenUpdate.jpeg | |||
* You will | == Scanning Workflow == | ||
* On your dashboard (the main screen after | To begin, ensure that you have a compatible device. You can refer to the list available at [https://www.nptracker.co.za/scanning.html this link] or contact us at [info@nptracker] to update the list with any tested devices not currently listed. | ||
** In the NPS-ACCESS application click on '''SCAN IN''' then | |||
** | === Linking Your Scanner to Your NPS-CLOUD Account === | ||
[[File:NPS-CLOUD_Dashboard.png|thumb|center|Figure A|600px]] | |||
=== Scanning | [[File:NPS-ACCESS TokenUpdate.jpeg|thumb|right|Figure B|200px]] | ||
[[File:NPS-ACCESS IDScan.jpeg | |||
In the NPS-ACCESS application click on '''SCAN IN''' then select '''DL/ID Card''' | * You will need an NPS-CLOUD account to create or log in. Please visit [https://www.npscloud.co.za/login.php www.npscloud.co.za] to get started. | ||
Once the scanner | * On your dashboard (the main screen after logging in), you will see a barcode (Figure A). Scan this barcode using the NPS-ACCESS application. | ||
=== Scanning a | ** In the NPS-ACCESS application, click on '''SCAN IN''', and then choose either '''License Disk''' or '''DL/ID Card'''. A viewfinder will open, where you should place the barcode. | ||
[[File:DLDP.png | ** After successful scanning, you will see a temporary message (Figure B) stating '''Access token updated'''. This indicates that the scanner has been linked to your NPS-CLOUD account. You can link multiple devices to your account if needed. | ||
In the NPS-ACCESS application click on '''SCAN IN''' then select '''DL/ID Card''' | |||
Once the scanner | === Scanning an Identity Document Card === | ||
<!-- [[File:NPS-ACCESS IDScan.jpeg|thumb|center|Figure C|200px]] --> | |||
In the NPS-ACCESS application, click on '''SCAN IN''', and then select '''DL/ID Card'''. A viewfinder will open. Place the ID card's barcode inside the viewfinder. | |||
Once the scanner detects the barcode, the application screen will switch to the ID info screen (Figure C). If the screen does not change to this screen, it means the barcode was not read and decoded. This could be due to a barcode viewfinder error or an unsupported device unable to decode the barcode. | |||
=== Scanning a Driver's License Card === | |||
[[File:DLDP.png|thumb|center|Figure D|200px]] | |||
In the NPS-ACCESS application, click on '''SCAN IN''', and then select '''DL/ID Card'''. A viewfinder will open. Place the driver's license card's barcode inside the viewfinder. | |||
Once the scanner detects the barcode, the application screen will switch to the driver's license info screen (Figure D). If the screen does not change to this screen, it means the barcode was not read and decoded. This could be due to a barcode viewfinder error or an unsupported device unable to decode the barcode. | |||
=== Scanning a Vehicle License Disk === | === Scanning a Vehicle License Disk === | ||
[[File:MVDP.png | [[File:MVDP.png|thumb|center|Figure E|200px]] | ||
In the NPS-ACCESS application click on '''SCAN IN''' then select ''' | In the NPS-ACCESS application, click on '''SCAN IN''', and then select '''License Disk'''. A viewfinder will open. Place the license disk's barcode inside the viewfinder. | ||
Once the scanner | Once the scanner detects the barcode, the application screen will switch to the disk info screen (Figure E). If the screen does not change to this screen, it means the barcode was not read and decoded. This could be due to a barcode viewfinder error or an unsupported device unable to decode the barcode. | ||
== Data on NPS-CLOUD == | == Data on NPS-CLOUD == | ||
All scanned and decoded barcodes will be stored on the NPS-CLOUD and linked to your account | All scanned and decoded barcodes will be stored on the NPS-CLOUD and linked to your account. You can access the following information: | ||
=== Last | |||
[[File:NPS-CLOUD_Dashboard.png | === Last Scanned Disk Plates === | ||
On your dashboard (the main screen after | [[File:NPS-CLOUD_Dashboard.png|thumb|center|Figure F|600px]] | ||
=== | On your dashboard (the main screen after logging in), you will see the last disk or ANPR plates feed displayed. This feed helps determine if the feed or disk scanner is operational. | ||
[[File:NPS-CLOUD ReportLicence.png | |||
In your NPS-CLOUD console | === License Disk Scanned Reports === | ||
=== Driver/ID Card | [[File:NPS-CLOUD ReportLicence.png|thumb|center|Reports License Disk Scans|600px]] | ||
[[File:NPS-CLOUD ReportDrivers.png | In your NPS-CLOUD console, navigate to '''Reports''' and select '''License Disk Scan(s)'''. This will display a list of all license disk scans conducted by any linked scanner. Please note that the availability of the list depends on your selected account subscription. | ||
In your NPS-CLOUD console | |||
=== Driver/ID Card Scanned Reports === | |||
[[File:NPS-CLOUD ReportDrivers.png|thumb|center|Reports Driver and ID Card Scans|600px]] | |||
In your NPS-CLOUD console, navigate to '''Reports''' and select '''Driver/ID Card Scan(s)'''. This will display a list of all driver's license or ID card scans conducted by any linked scanner. Please note that the availability of the list depends on your selected account subscription. | |||
Latest revision as of 05:06, 19 June 2023
This tutorial provides a step-by-step guide on how to link and scan using our scanner applications. For demonstration purposes, we will focus on the NPS-ACCESS application.
If you need assistance with scanning or want to check the list of tested devices, please refer to this post.
Scanning Workflow
To begin, ensure that you have a compatible device. You can refer to the list available at this link or contact us at [info@nptracker] to update the list with any tested devices not currently listed.
Linking Your Scanner to Your NPS-CLOUD Account
- You will need an NPS-CLOUD account to create or log in. Please visit www.npscloud.co.za to get started.
- On your dashboard (the main screen after logging in), you will see a barcode (Figure A). Scan this barcode using the NPS-ACCESS application.
- In the NPS-ACCESS application, click on SCAN IN, and then choose either License Disk or DL/ID Card. A viewfinder will open, where you should place the barcode.
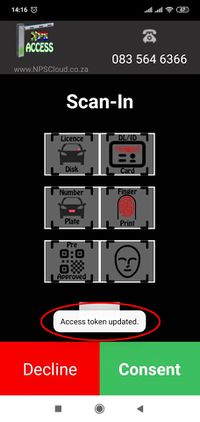
- After successful scanning, you will see a temporary message (Figure B) stating Access token updated. This indicates that the scanner has been linked to your NPS-CLOUD account. You can link multiple devices to your account if needed.
Scanning an Identity Document Card
In the NPS-ACCESS application, click on SCAN IN, and then select DL/ID Card. A viewfinder will open. Place the ID card's barcode inside the viewfinder. Once the scanner detects the barcode, the application screen will switch to the ID info screen (Figure C). If the screen does not change to this screen, it means the barcode was not read and decoded. This could be due to a barcode viewfinder error or an unsupported device unable to decode the barcode.
Scanning a Driver's License Card
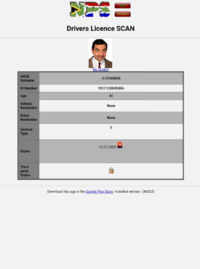
In the NPS-ACCESS application, click on SCAN IN, and then select DL/ID Card. A viewfinder will open. Place the driver's license card's barcode inside the viewfinder. Once the scanner detects the barcode, the application screen will switch to the driver's license info screen (Figure D). If the screen does not change to this screen, it means the barcode was not read and decoded. This could be due to a barcode viewfinder error or an unsupported device unable to decode the barcode.
Scanning a Vehicle License Disk
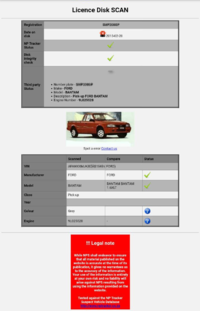
In the NPS-ACCESS application, click on SCAN IN, and then select License Disk. A viewfinder will open. Place the license disk's barcode inside the viewfinder. Once the scanner detects the barcode, the application screen will switch to the disk info screen (Figure E). If the screen does not change to this screen, it means the barcode was not read and decoded. This could be due to a barcode viewfinder error or an unsupported device unable to decode the barcode.
Data on NPS-CLOUD
All scanned and decoded barcodes will be stored on the NPS-CLOUD and linked to your account. You can access the following information:
Last Scanned Disk Plates
On your dashboard (the main screen after logging in), you will see the last disk or ANPR plates feed displayed. This feed helps determine if the feed or disk scanner is operational.
License Disk Scanned Reports
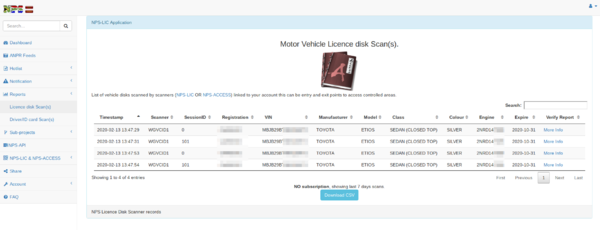
In your NPS-CLOUD console, navigate to Reports and select License Disk Scan(s). This will display a list of all license disk scans conducted by any linked scanner. Please note that the availability of the list depends on your selected account subscription.
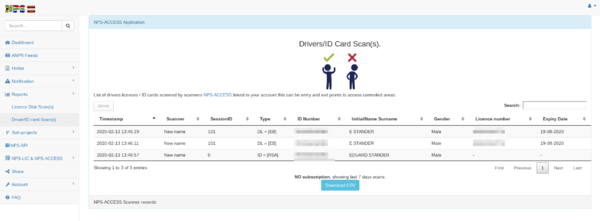
Driver/ID Card Scanned Reports
In your NPS-CLOUD console, navigate to Reports and select Driver/ID Card Scan(s). This will display a list of all driver's license or ID card scans conducted by any linked scanner. Please note that the availability of the list depends on your selected account subscription.

